 Scrambled eggs can be dry or watery, fluffy, or flat. That goes for other egg methods too – there’s a big difference between an overcooked hard-boiled egg and a perfectly jammy egg. So, here is a tutorial on how to cook eggs perfectly, every time.
Let’s start with the most intimidating of the cooking methods: poaching eggs.
How to Make Poached Eggs
For poached eggs, you want to use super fresh eggs. A fresh egg will have a firmer, tighter white that will stay together better when poaching.
Fill a pot with water no greater than 2 inches high, about the height of a teaspoon if you measure it from the tip of the bowl to the beginning of the spoon handle. Bring the water to just barely a simmer and add a pinch of salt. You should be able to see some bubbles at the bottom of the pot.
Using a meat thermometer, watch for your water to come to around 190 degrees. Then you’re ready to go.
When you can maintain 190 degrees, crack an egg into a small ramekin. Use a large spoon to swirl the water in the pot to break up any bubbles at the bottom of the pot.
Spin the water gently with the spoon in a circular motion around the inside of the pot to create a small vortex so there’s a still spot of the water in the middle and the rest of the water is spinning around it.
In this middle spot, gently press the ramekin into the water as you are pouring the egg into it. Watch your fingers – the water will burn! The lip of the ramekin cup should go under the water as you pour the egg in. The egg will swirl in the pot and the egg white will start to solidify. If the white part is loose and starts to travel around the pot, gently spin the water around the inside edge of the pot again with a spoon to encourage the egg white to stay together.
Set your timer for around 4 minutes. At the four-minute mark, use a slotted spoon to gently pull the poached egg out of the water. The egg is done when the yolk has a nice spring to it and still feels soft and liquidy in the middle, but the white is pretty firm.
Boiled Eggs
When boiling eggs to make hardboiled eggs, soft-boiled eggs, or jammy eggs, it’s best to use eggs that have been in the refrigerator for at least 2-4 weeks, as they will be easier to peel. (If you bought them at the grocery store, there’s a good chance they’re that old by the time they get to you.) Use the float test below to make sure your eggs are still good!
Fill a pot of water about half full with water and a pinch of salt and bring it to a boil on your stovetop.
Once the water is boiling, add your eggs and set your timer.
- For jammy or soft-boiled eggs, set your timer for 6.5-7 minutes.
- For hardboiled eggs, set your timer for 10-11 minutes.
Set up a bowl filled with ice and water. Once the timer goes off for your soft or hard-boiled eggs, use a slotted spoon to take the egg out of the pot and plunge them into the cold water. This will help the egg yolk stop cooking. Allow them to cool in the water for around 10 minutes.
Once the eggs have cooled, gently place the egg on a hard surface and roll it back and forth to help the shell crack in a bunch of different places. Carefully peel the cracked shell away. Sometimes running the egg under lukewarm water when peeling or using the back of a spoon helps.
For jammy eggs, slice the egg in half lengthwise. Enjoy as-is, sprinkle a little salt and pepper on top, or spoon out the silky yolk onto a slice of bacon or a salad.
For hardboiled eggs, pack for breakfast or snacks, or slice in half and serve alongside sliced avocado or crispy bacon.
How to Make Fluffy Scrambled Eggs
In a small bowl, whisk together 2-5 eggs and a pinch of salt and pepper if you’d like.
Heat a well-seasoned cast-iron skillet over medium-low heat. Once hot, add 1 tablespoon of avocado oil or grass-fed butter to the pan and swirl it around. After adding the oil or right as the butter is just melted, pour the eggs into the pan so they fill the entire diameter of the pan.
Just as you see the edges start to set against the side of the pan, use a silicone spatula to move the soft egg from the edges to the center of the pan. As you drag the egg from the edges to the center, some cooked egg will be pushed to the center, while the uncooked egg will be displaced to the edges, cooking the egg slowly.
Continue dragging the edges of the egg toward the center of the pan and add about another ½ tablespoon of butter cut into small chunks to the pan. This part is optional, but it helps make the eggs extra creamy.
When the egg mixture is still a bit runny but beginning to firm up slightly, begin folding the egg with a silicone spatula by folding the edges of the egg towards the middle of the pan. This will encourage the egg to cook gently without breaking up into a bunch of tiny pieces. After doing this a few times, turn off the heat and continue folding the egg to the center of the pan to encourage light cooking. The eggs are finished when they are soft and silky. They should have a little gloss to them and be creamy, but still mostly cooked.
Remove the egg from the pan to stop it from cooking and place it on your plate. Top them with a pinch of salt and pepper and serve alongside your favorite breakfast foods. We served ours with an arugula salad and a few slices of crispy bacon.
How to Make a Perfect Omelet
In a small bowl, whisk together 3-4 eggs and a pinch of salt and pepper. Arrange any fillings you want to use in the omelet (we used chopped-up roasted broccoli and organic shredded cheddar cheese).
Heat a well-seasoned cast-iron pan over medium heat. Once hot, add a tablespoon of avocado oil or grass-fed butter to the pan and swirl it around. Right after adding the oil, or after the butter is just melted, pour the eggs into the pan so they fill the entire diameter of the pan.
As the egg cooks, you will see the edges of the omelet turn from translucent to opaque. Lower the heat slightly and watch the egg continue to cook. Once the egg begins to bubble and parts of it begin to firm up slightly, add your toppings to one-half of the omelet.
Carefully flip the half of the omelet without toppings directly on top of the half with the fillings. Allow the egg to cook for an additional 45 seconds to 1 minute.
Use a spatula to carefully flip over the omelet and allow it to cook for an additional minute or so, or until the egg is fully cooked and the cheese filling inside is melted.
Place on to a plate and cut in half, if you’d like.
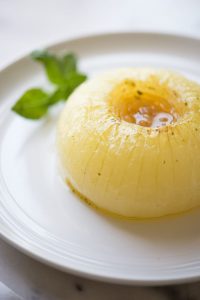
How to Cook Sunnyside Up Eggs Evenly
Tip: Sunnyside eggs are a little finicky and the time to prepare one to another may vary based on the temperature of the pan, size of the egg, freshness of the egg, etc., so feel free to adjust the time it takes for the white to set.
Heat a well-seasoned cast-iron skillet over medium-low heat. Once hot, add 1/2 tablespoon of avocado oil and swirl it around. After swirling the oil around in the pan, gently crack an egg into the center of the pan.
Allow the edges of the egg white to set and turn from clear to white, but the egg whites around the yolk should still be very runny. When you see this, drizzle a tablespoon or two of water into the pan around the edges of the egg white.
Quickly cover the pan with a lid. Once you hear the water you added sizzle aggressively, turn off the heat. Keep the lid on the pan for 45 seconds to a minute or so, then take a peek at the egg. When the egg is finished, the egg white should be fully set but the yolk still liquidy. If the white around the yolk is not yet set, cover the pan again. If the yolk starts to film over with white, you’ve cooked the egg a little too long.
Serve your egg as is, or dip a piece of bacon or sweet potato fry into the yolk.
How to Make Over-hard Eggs (And Flip Them Without Breaking the Yolk)
Heat a well-seasoned cast-iron skillet over medium-low heat. Once hot, add 1/2 tablespoon of avocado oil and swirl it around. After swirling the oil around in the pan, gently crack an egg into the pan. If you are making multiple eggs at a time, use 1 tablespoon of avocado oil and crack a few eggs into the pan at a time, trying to confine them to different areas in the pan.
Allow the whites of the eggs to mostly set. You’ll see the whites begin to bubble as they firm up. Once the white is fairly set, carefully flip the egg over with a spatula. The whites near the yolk may still be shiny and not set yet, but as long as the edges are set and the whites are bubbling, you should be able to flip the egg over without an issue.
Allow the egg to cook on the other side. Use a finger to feel the yolk in the center of the egg. When it feels firm and no longer springy, the yolk is firm and fully cooked.
Repeat with more eggs, if desired. Serve with your favorite sides.
Tip: For an over easy or over medium egg, simply cook the egg for less time before removing it from the heat. For an over-easy egg, the yolk should feel liquidy when touched. For an over medium egg, the yolk should feel springy like a ball of fresh mozzarella.
Egg FAQs
What’s the Best Kind of Cookware to Cook Eggs?
While there is some less toxic non-stick cookware out there compared to the past, we think a well-seasoned cast-iron skillet is a great option. It is durable, heats evenly, and cooks eggs quickly. For boiling and poaching, a stainless steel saucepan works best.
How Do I Choose the Best Quality Eggs?
Whenever possible, opt for pastured eggs. Chickens that are pastured have the best chance to eat not just packaged chicken feed, but also bugs, roots, and other scraps that make their yolks rich and nutritious. Here’s an article on how to choose the best eggs for your family.
How to Tell the Difference Between a Store-bought Egg and a Farm-fresh Egg
You can often tell the difference between a store-bought and farm-fresh egg by looking at the yolks side by side. A fresh egg yolk will have a rich, deep yellow to orange color, while mass-produced eggs are a much paler yellow. Keep in mind that farmers can add items like marigolds to chicken feed, which artificially turn their yolks more golden or orange.
Do You Have to Refrigerate Eggs?
Eggs in the United States are refrigerated because their protective shell layers are washed off in preparation to be sold. If you get eggs from a farmer or your neighbor, ask if they’ve been washed.
How Long Do Eggs Stay Fresh?
Unwashed eggs are shelf-stable for about two weeks, and they keep for up to three months in the refrigerator.
How Do You Know Whether an Egg Has Gone Bad? The Float Test for Egg Freshness
Eggs have a decent shelf life in the fridge, but how do you know if an egg is still good to use? Oftentimes, eggs can be used beyond their sell-by date, but to be sure, I use the float test.
Fill a large jar with water and carefully place the egg into the water.
- If the egg sinks to the bottom and rests on its side horizontally, the egg is fresh.
- If the tip of the egg points directly downward so the egg is vertical in the water, the egg is older and should be used up right away (these are great options for boiling).
- If the egg floats in the water, it’s spoiled and should be tossed.
If an egg has spoiled, you’ll know the second you crack it. The rotten egg smell is so strong that there’s a good chance you’ll have to open your windows and leave your house until it clears. When in doubt, use the float method. It’s not something you want to experience.
Egg Freshness and Cooking Methods
The freshest eggs aren’t always the best option for every egg preparation.
- For soft or hard-boiling eggs, opt for slightly older eggs. These will peel more easily.
- For poached or sunnyside-up eggs, opt for more fresh eggs. This will keep the white tight.
- For any other cooking methods, you have the flexibility to use whatever eggs you have on hand.
Egg Nutrition Information
For 1 Large Egg:
Calories: 70
Fat: 5g
Saturated Fat: 1.5g
Cholesterol: 185mg
Protein: 6g
Carbs: 0g
From MarksDailyApple.com
 sing the gorgeous root vegetables and squashes of fall, let’s make a one-pot braised pork roast that takes comfort food to the next level.
 Ingredients:
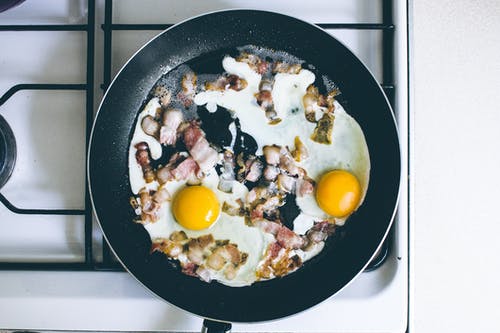

 INGREDIENTS
 Ingredients
 INGREDIENTS
 Ingredients:
 Ingredients